Creating a Custom CSS Style/Class
Using CSS (Cascading Style Sheets) allows you to set text font, size, and color for all text on all pages. Using CSS will make your web site pages uniform and use the same text through out. You should go over the numerous gotFusion tutorials on CSS to get a complete understanding of CSS and how it works within Fusion.
Make sure you have your web site project set to use CSS. This has been the default for the last few releases of NetObjects Fusion but if you are using an earlier product you need to change from HTML to CSS formatting
This gotFusion tutorial will show you where to check to make sure your site project is set to use CSS formatting.
 Go to Page View on any page of your web site project. If you are not at page view press the Page Icon in the icon bar. Go to Page View on any page of your web site project. If you are not at page view press the Page Icon in the icon bar.
From the menu bar select Text > Manage Styles
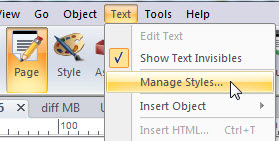
You will see the Manage Styles properties palette. This will show you all of the CSS styles that are used by your Fusion site project. You can edit any of them (even the ones that you set in Style View) from this Properties palette. This tutorial covers creating a new CSS style so:
- Click the New button at the bottom left.
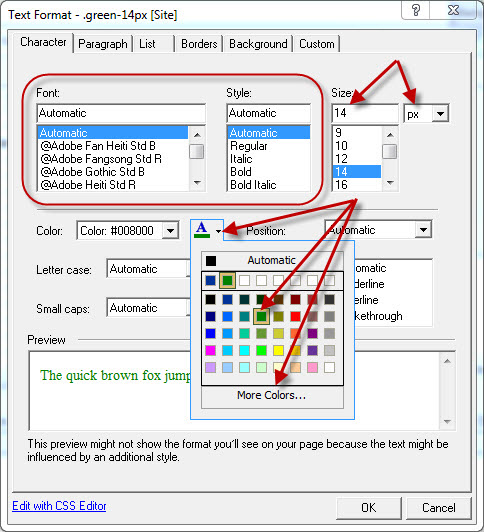
- The first option/bullet lets you change an existing style. We want a new style so select the second option of Create Custom Style and give it a name. You cannot have spaces so make sure you use one word or a hyphen or underscore between words. Make the name of the style as descriptive as you can so that you know what it is when you go to apply it. Our example is green-14px.
- We want to use this new style on every page so select Site Wide
- Click the OK button to go to the next palette where you will define the style

On the formatting palette you have all of the formatting options that are available.
We want to only change the size and color not the font so we leave everything set to automatic other than the size (14px) and the color (green).
If you want to uses a color that is not on the color picker, click on More Colors and then you can enter the hex or RGB numbers for the color you want to use. Your formatting will be shown to you in the preview window so that you know what it will look like and can change or tweak the look. When finished press the OK button to write the CSS style to your style sheet. Then close the Manage Styles properties palette
Applying a Custom CSS Style/Class
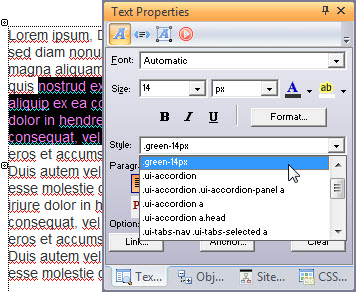
On your page, highlight the text you wish to apply your custom CSS style to. From the drop down list, select the style and it will be applied. Your custom styles will always be at the top of the Style drop down so that they are easy to locate and uses. That's all there is to using custom CSS styles. Since you selected to use the style on all pages the text formatting drop down will show green-14px on every page.
|
Did you find this tutorial useful?
Do you want to keep this resource online?
Make a donation to keep gotFusion alive
This page was written by and is maintained by turtle
|
|


