We have learned how to create a page border using Master Borders. Now let's learn how to create page borders using Zero Margins in NetObjects Fusion.
Note: Netscape 4.x browsers will not display the borders.
View the CSS Master Compatibility Chart
- Create a text object

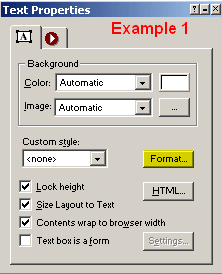
- On the text box properties menu - size layout to text and contents wrap to browser width-, click "Format" Example 1
- Choose Border and change the highlighted section to your preferences- apply border to "top", "bottom", "right" and "left". Example 2
- Create a Table and insert into the text object - this will help you align your page correctly. I used a table 3 columns by 3 rows.
I did this so that I could place the contents of my
- top master border (from my other pages) into the first column of the table (I merged the the 3 columns to make one solid row)
- side master border into the first column of this table (merging the rows)
- bottom master border into the last row of the table (merging all three columns)
The page border created above will look like this page. Remember, you will loose the functionality of the Master Borders when using this method BUT using Server Side Includes can cure this issue!
|