Why should you read this tutorial?
Anyone who is not familiar with using the NetObjects Fusion (NOF) Photo Gallery (PG) tool needs to understand how this increasingly sophisticated tool works. Many of you will know all about the Photo Gallery from using older products, and many more will be new to NOF (or new to the PG tool, if you're upgrading from earlier versions).
For new users Fusion
New users of NOF should also read Using the Fusion Photo Gallery Tool. Many of the tips in that article are just as relevant in the newer version as they were for early versions.
I will eventually combine the two articles into one, but I'd like to let the dust arising from the new release settle for a while.
For users upgrading from Fusion 7.0
The newer version has improved Photo Gallery tool is the tangible result from the requests of many early users. There are many new options in the Photo Gallery that version 7 users will especially appreciate. Read on to learn about–
- The ability to create and use Photo Gallery Profiles
- The ability to use original images on the Photo pages
- The ability to save and re-use your own custom Output Settings
Add Photo Gallery Options
When you select the Photo Gallery (PG) tool and draw a box on your page, Fusion requests several pieces of information.
- If you want to make a new PG, choose the Create a new PG option.
- If you want to duplicate an existing PG, but use different settings to generate higher quality or larger sized images (with larger file sizes) for broadband users vs. dialup users, choose Insert an existing PG.
If you are making a new PG, select Create a new Photo Gallery.
- Assign the new PG a unique name
- Assign the new PG a profile (if you have one that's applicable). (See PG Profiles)
If you want to duplicate an existing PG, but use different settings,
- Select Insert an existing Photo Gallery, or
- Select the existing PG to insert on your page.
- Assign the PG a different profile (if you have one that's applicable). (See PG Profiles)
If you don't have an existing profile,
- Set up the PG with all the settings you desire, and
- Save the PG profile by clicking Save Profile. (See PG Profiles)
Photo Gallery Profiles
Use PG profiles to save setup time on any new PGs you want to create. Instead of setting dozens of individual settings for the PG, when you add a new PG, do the following:
- Name the PG with a unique name (for example, BroadbandGallery)
- Pick a saved Profile with settings appropriate for users of that gallery.
Using the Save Profile button
When you have completely set up all your Photo Gallery settings to your fancy, here's how to save these settings to a profile:
- Click the Save Profile… button
- Give the profile a unique name.
What a Profile contains
A profile stores—
- Your settings for the Tumbnail Page image output
- Your settings for the Photo Page image output
- All generic Thumbnail page settings
- All generic Photo Page settings
A profile does not store—
- Options for individual pictures in the PG, such as rotation or path to the file, caption and title for the images, or
- Thumbnail page options like the text link option
Using a Profile in new Photo Galleries
To use an existing profile in a new Photo Gallery,
- Create a new PG (see Add Photo Gallery Options)
- Name the PG
- In the Profile list, select one of your existing PG Profiles.
Your settings from the existing profile will apply to the new PG. (See What a Profile contains)
Backing up profiles
To back up your Profiles in case of system problems, do the following:
- Open Windows Explorer,
- Navigate to x:\NetObjects Fusion xx\NetObjects System\Profiles,
- To select all Profile files and folders, press CTRL+A,
- To copy all Profile files and folders, press CTRL+C,
- Navigate to another folder where you want to store your backups,
- Press CTRL+V.
Tip: With only one user and a few saved profiles, the profile files and folders are small enough to fit very comfortably on a floppy disk.
Changes to Photo Gallery Properties Editor
The main section of the PG Properties Editor works the same as it did in NOF version 7. Use the three tabs at the top to select which part of the PG you want to set up.
Images Tab
The main section of the Images tab work the same as it did in earler versions of Fusion. Use the Thumbnail Image and Photo Image sub tabs to set up the PG output options.
Thumbnail Image sub-tab
Use the Thumbnail Image sub tab to set up the Thumbnail page for your Photo Gallery.
Using the new Output Settings options
|

|
|
Figure 1 — Output settings dialog
|
|
Fusion divides the new Output Settings options into two sections with a dashed line between the sections. In Figure 1, notice that I have two saved Output Settings, KSImages and ksThumbs.
Above the dashed line, you see—
- Default (resets the settings to the NOF default).
- Your saved Output Settings (if you have saved any).
Below the dashed line, you see—
- Default Output Settings (Resets the settings to the NOF default).
- User Settings (Sorry, I'm not sure what this is for!).
- Use Original Image (This will be popular with users who own advanced graphic editors and who like to hand-tweak their images).
- Save Settings…(Prompts you for a name to use for the new saved settings set).
Using the Alt Tag option
When you enter a Title for an image, Fusion copies the title to the Alt Tag box. If you want a different Alt Tag for the Thumbnail, delete the Alt Tag text and enter your own.
Using the Photo Image sub-tab
The new Output Settings and Alt Tag box in the Photo Image sub tab work almost the same as they do on the Thumbnail Image sub tab.
New on the Thumbnail Page tab
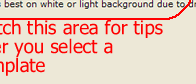
The new version has Template options for you to use with your Thumbnail images. To avoid surprises with your results, read the usage notes (see Figure 2) that appear next to the Preview window.
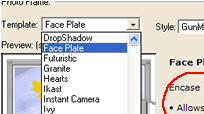
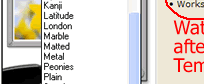
New on the Photo Page tab
Fusion has twenty Template options for you to use with your Photo Page images. To avoid surprises with your results, read the usage notes (see Figure 2) that appear next to the Preview window.
|
|
|
Figure 2 — Photo Page Template tips
|
More information
For more information about Photo Gallery usage, see Using Fusion's Photo Gallery Tool.
|
Did you find this tutorial useful?
Do you want to keep this resource online?
Make a donation to keep gotFusion alive
|
|