|
You find that your normal globally applied link style settings do not work with links you have in a certain area on your web pages because the colors or font or size of the text is not want you want.
You can create a custom CSS style for this issue and apply the custom CSS to any page you wish.
Step 1:
Make sure that you have CSS enabled for the web site project you are working on. To enable CSS from the Menu bar select Tools > Options > Current Site and on the general tab of the Site Settings Palette make sure that Enable CSS has a tick in the radio button. Click this link to see what this palette looks like to make sure you are in the right place
Step 2
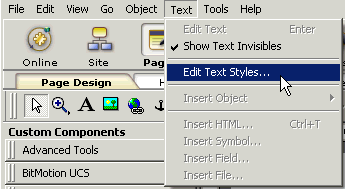
 From the NetObjects Fusion menu bar select Text then pick Edit Text Styles. From the NetObjects Fusion menu bar select Text then pick Edit Text Styles.
This will bring up the CSS user interface where you will create a custom CSS style that you can apply to any individual link to have it look differently from your standard links settings you have made in the current web style you are using in Style View
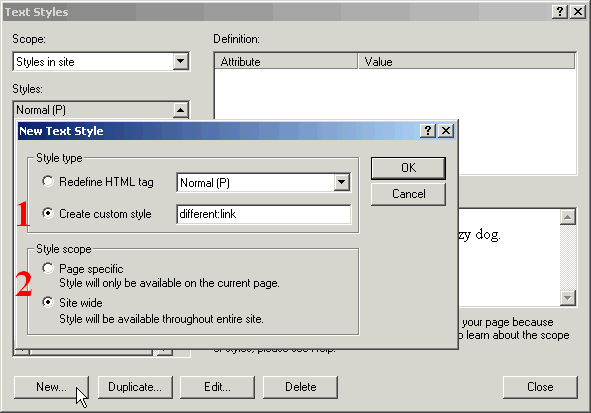
Create 4 custom styles by clicking the New button at the bottom of the Text Styles properties palette.
- Place a tick in the Create custom Style radio box and give your new link style a name (this example uses the style name of different). Make the first style different:link (your unique name a colon and the word link. You can use any name you wish but different will be used in this example)
- If you wish your custom link style to be available on every page place a tick in the Site Wide radio button, if you only want this style to be used on a single page select the Page Specific radio button. NOTE: You must be on the actual page where you want to use the style if you select Page Specific

 Make 3 additional CSS tags by following the steps above and name them Make 3 additional CSS tags by following the steps above and name them
different:active
different:hover
different:visited
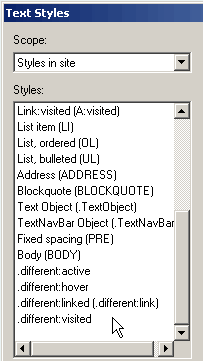
At the bottom of your list of Styles in the properties palette you should see your 4 new custom CSS style declarations
To apply these styles to any link all you need to do is select the link, click the link button on the text properties palette, click the HTML button which is located at the bottom left corner of the Links Properties palette and insert class="different" in the Inside the Tag tab of that palette
Step 3:
You can apply your Custom link style to any text link and it will inherit the attributes you have set when you created it.
NOTE: If you wish to edit any of your new link CSS styles bring up the CSS interface by selecting Tools > Edit Text Styles, select the style from the display list and click Edit to bring up that style's CSS properties.
Your custom link style will not display within the Fusion design as it is applied outside of the GUI. In order to view your newly created link style you should preview your page and test.
|
Did you find this tutorial useful?
Do you want to keep this resource online?
Make a donation to keep gotFusion alive
This page was written by and is maintained by turtle
|
|