Integrating the Surreal CMS System into NetObjects Fusion
Overview and Considerations
Integrating an external CMS package with your Fusion site requires a little thought and some planning before you start the process.
Once your Surreal CMS package and your Fusion web site project is completed you or your CMS users / clients will be using a web browser to update your web site content instead of NetObjects Fusion.
Once you have declared user editable content areas on your web site pages and submitted these to Surreal, your users / clients will be able to add and edit content without having to learn how NetObjects Fusion works. This is useful if they have weekly specials they need to update, if they have a constantly changing menu of food they need to change, or they need to add the latest news article or update school soccer scores, and so on. There are any number of reasons you might want to set up a section of one or more pages where your clients can log in using a web browser and edit a section of a page.
Important: Once you publish your pages to the web and submit them to the Surreal CMS system you should not re-publish those pages in Fusion again. If you do a remote publish in Fusion any changes made by the client will be lost. Therefore you need to consider HOW you create your site and HOW you will handle future changes to the design of the site. Since Fusion will over write any live CMS content when a page is published it is best to set up your CMS pages after the web site project is finished or unlikely to need any design or layout changes that would disrupt live CMS content. Once the CMS system is installed and running you should only use the local publish feature then use a 3rd party FTP program to upload only pages that do not contain the CMS content unless you are using the methods outlined in the advanced gotFusion CMS tutorial.
This basic tutorial assumes that you do not already have a Surreal CMS account and you are starting from scratch to create a CMS page for a user / client. It will walk you through the 3 basic steps you need to take to get a Surreal CMS page up and running.
Step 1: Setting up Fusion so Surreal CMS can identify editable content
Any page area on any page can be set up to be edited using Surreal CMS
This basic Surreal CMS tutorial will use a single Fusion text box as the example editable area
- Go to the page you wish to have the editable content located on
- From the toolbar select the Text Tool and draw a text box to hold content
- Enter in some "place holder text". Something like "editable content goes here"
- Click outside of the text box area to leave insert mode
- Now single click on the text box to select it outside of insert mode
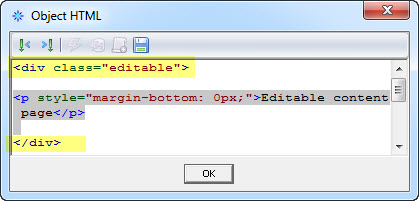
- Press the HTML button and wrap the paragraph tag with the following div statement
div class="editable" and enter a closing /div tag after the Fusion paragraph statement
If you do not see the Fusion paragraph statement you are still in insert mode. Close the insert dialog box, click outside of the text box, then single click the text box again to select just the text box and press the HTML button once again. You should now see the paragraph tag that you wrap with the div statement. The dialog box should say Object HTML and NOT Insert HTML
You can add a text box to any Fusion page and wrap it with the editable div statement and Surreal CMS will locate that area of the page and allow that text box content to be edited from a web browser.
Do a remote publish of the page you added the text box and div statements to so that they are uploaded to your domain. That's all there is to using Surreal CMS as far as what is necessary to add in Fusion.
Step 2: Creating A Dedicated FTP Account For Surreal CMS
Before you add your web site in Surreal CMS you should make a dedicated FTP account in your web hosting control panel to use with Surreal CMS. You DO NOT want to use your primary/root FTP account. Log into your web hosting control panel and make a new FTP account to use with Surreal CMS.
If you have a gotFusion Windows hosting account follow this tutorial for making a new FTP account in your Windows hosting package. Select wwwroot as the default folder. This will allow this new FTP account to access only your active web content and not allow full root access to your hosting account.
If you have a gotFusion Linux hosting account follow this tutorial for making a new FTP account in your Linux hosting package. Select public_html as the default folder. This will allow this new FTP account to access only your active web content and not allow full root access to your hosting account
If you do not have your web hosting with gotFusion and you do not know how to create FTP accounts on your web hosting package, you will need to contact your web host and ask them for assistance. Do not, under any circumstances, use your primary FTP account as your Surreal CMS FTP account. Once you have your dedicated Surreal CMS FTP account created you can add your web site using this FTP account information.
Step 3: Creating Your Surreal CMS account:
Go to the Surreal CMS web site and click on the big green Sign Up button. Enter your name, a (valid) email address, and a secure password. Your email address will be your account name so use a real email address. Since you are creating an account that will be able to edit your web site's content, use a secure password. One that is made up of random upper/lower case alpha/numeric plus special characters that are at least 10 digits long (something like this: j8*Fz5kqB9). Don't use something like admin, or mycms, or anything that is easily cracked because this account will be able to change your web site content so make your password secure.
Once you have your account set up you need to log in. You will always log into your Surreal CMS account from this URL: http://edit-content.com/
Your first task in your new Surreal CMS account is to associate the account with a web site. The free level Surreal CMS account allows you to setup 3 web sites. When you first log in, you will automatically be taken to the associate web site page. If you need to get to this page later, you would select the Websites tab on your account page
On the Surreal CMS Add Websites form. Enter:
- Your domain name starting with http
- The FTP information will default to ftp.yourdomain.com.
- If you use gotFusion Hosting put a check in the PASV box.
- For gotFusion hosting accounts leave the port number set to 21
- Enter the Username of the FTP account you created for Surreal
- Enter the Password of the FTP account you created for Surreal
- Leave Website Root set to / (as you set your root folder in the new FTP account you created)
Registering Editabe Pages in your Surreal CMS Account
- Select your web site from the list of websites shown
- Click on the Editable Web Pages icon
- In the Surreal CMS folder browser window, select each page you made editable using the div statement. You will only see those pages that you have entered the editable class in Fusion.
- When you are finished and have selected all of the pages you have made editable click the done button
Changing CMS content using the Surreal CMS interface
- Log into your Surreal CMS account http://edit-content.com/
- Select your web site from the list of websites shown
- Select any page in the list that you wish to edit content on
You will see the existing content in the editor. If this is the first time you have editing the page you will see the place holder text you entered in Fusion. You can add, edit, remove any content using the Surreal CMS editor.
You should download and go over the Surreal CMS Users Manual to fully understand everything that is posable using this CMS system
If you want to see how far you can go with surreal CMS and NetObjects Fusion Go over the gotFusion Advanced CMS tutorial. You will be amazed how slick you can make your NetObjects Fusion CMS system work for your customers.
|
Did you find this tutorial useful?
Do you want to keep this resource online?
Make a donation to keep gotFusion alive
This page was written by and is maintained by turtle
|
|


