Setting up a CSS Style Sheet for Text
Using CSS (Cascading Style Sheets) allows you to set a default text font, size, and color for all text on all pages. Using CSS will make your web site pages uniform and use the same text through out. You should go over the numerous gotFusion tutorials on CSS to get a complete understanding of CSS and how it works within Fusion.
Make sure you have your web site project set to use CSS. This has been the default for the last few releases of NetObjects Fusion but if you are using an earlier product you need to change from HTML to CSS formatting
This gotFusion tutorial will show you where to check to make sure your site project is set to use CSS formatting.
Make a Duplicate Style Before You Edit Anything
Go to Style View and make a duplicate style based on the stock style you have selected to use for your web site project. You need to do this before you edit any settings in the stock style. NetObjects Fusion shares styles between any web site project that uses the same style so you do not want to edit a stock style. Make a duplicate of the stock style then edit the unique duplicate.
This gotFusion tutorial will go over how you create a duplicate style from one of the stock Fusion site styles.
Editing the Paragraph Tag on Your Duplicate Style
 Go to Style View. Select the Graphic tab. Scroll down to the (P) Paragraph tag and click on the text to select the paragraph tag to edit it. Go to Style View. Select the Graphic tab. Scroll down to the (P) Paragraph tag and click on the text to select the paragraph tag to edit it.
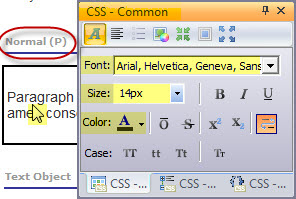
Open the CSS - Common properties palette
On the First Tab Select:
- The font you wish to use for your text
- The size of the font (in pixels)
- The color of the font
If you wish all of your standard text to be Bold, Underlined or Italic, you can select these features on this palette. Remember: this is your default standard paragraph style so what ever you set on this palette will be applied to every letter, word, and paragraph of text on the entire web site. You should only make the basic settings at this stage. These are global settings
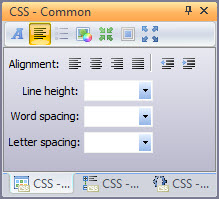 On the Second Tab Select: On the Second Tab Select:
- Character alignment (left, right, centered, justified)
- Line Height (the space between each line of text)
- Word Spacing (the space between each word)
- Letter Spacing (the space between each character)
If you are not sure what to select, use the defaults which is left justified and no set spacing. Some people like to use justified so the text is formated like a newspaper or book with no uneven right side.
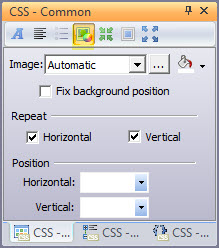 On the Forth Tab Select: On the Forth Tab Select:
- A color to run behind the text
- Whether the color is fixed or repeat
- Which direction the color will repeat
- The positioning of the background color
If you are not sure what to do, leave these as default. You probably do not want a color to run behind all of your text on every page so you can bypass these settings for your default text. You may never need to use any of these settings for your default font settings.
This setting might be useful for some of your header tags if you want to surround a header with a colored background.
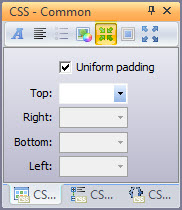 On the Fifth Tab Select: On the Fifth Tab Select:
You can select Uniform Padding which will apply the same setting to all sides or you can set top, bottom, left and right different amounts
Padding is the space between the text and the wall of the container (the text box or table cell).
This is a very useful setting as you can place text within a table cell that has no padding or spacing and only pad the text and allow other objects such as graphics have their own separate padding amounts. If you set the padding at the table cell, it is applied to every object that is within that cell.
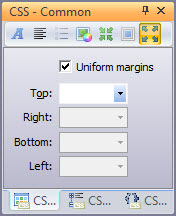
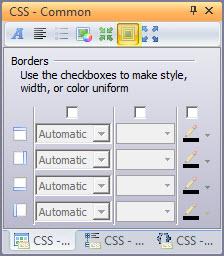 On the Sixth Tab Select: On the Sixth Tab Select:
You can place a border around your blocks of text by setting what you want within this palette. The borders you set will be applied to every block of text on your web site. This is a useful setting for specialized classes but is not too useful for your default paragraph setting. Since CSS can be applied to defaults Fusion has all of them available. This does not mean you should set them as defaults unless this look is what you are after.
 On the Seventh Tab Select: On the Seventh Tab Select:
Margins are different from padding. Margins are the space between the borders set on the sixth tab and the container (the text box or table cell walls). Padding is the space between the border and the text. So you have spacing control on either side of the border you select.
If you want more information about CSS margins and padding you can go to the W3schools site and read about Margins and Padding
Editing the Header Tags, Ordered/Unordered Lists
Text Objects and Links
After you finish editing the settings on the paragraph tag. scroll down and go thorough this same process for:
- Header tags H1 through H6
- Ordered Lists
- Unordered Lists
- Text Objects
- All 4 states of Links
You must set your default css style for Paragraph, Headers, Ordered and Unordered lists, Text Objects and Links.
If you do not define default text settings, what ever the site visitor has set for their browser defaults will be used. Most browser default text settings are Times New Roman.
Next tutorial: Creating Custom CSS Classes and Applying Them
|
Did you find this tutorial useful?
Do you want to keep this resource online?
Make a donation to keep gotFusion alive
This page was written by and is maintained by turtle
|
|


