|
OK.. So you have purchased all of the components that are available on the planet and now you want to combine some of the toolbars into one that you use all the time to make it easier to use.
First make a backup copy of your components folder for safety
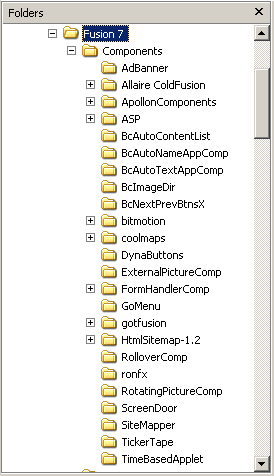
 Using windows explorer look in the components folder. Using windows explorer look in the components folder.
There you will see a list of all of the components that you have installed in the version of Fusion that the folder appears under.
Think up a descriptive name for the custom toolbar you wish to create (something like killer tools or Da Tools)
Remember this name (write it down) as you will be using it to associate the component icons onto this custom toolbar.
Plan out what components you wish to have on this custom tool bar. Most of this process is planing what you out what you use all the time and then putting together the custom tool bar with the most used component tools in one place.
Once you have a good idea what you want on a custom toolbar navigate to each of the components you wish to switch to your custom toolbar within the component folder.
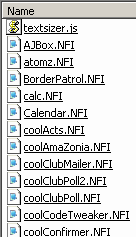
 Look for files that have the name of the component you want to add to your custom toolbar that end with NFI Look for files that have the name of the component you want to add to your custom toolbar that end with NFI
Click on the NFI extension file. Windows will tell you that it cannot open that file, put a check in the radio box titled Select the program from a list. Scroll down to Notepad and select Notepad, make sure that Always use the selected program to open this kind of file is checked. This will associate Notepad with all files that end with the NFI extension.
Notepad will open with the component control file (this is a text file that tells Fusion how to display information on the component)
Below is the NFI file for CoolMaps FileAway component
<NFX_NAME>fileAway.fileAway</NFX_NAME>
<NFX_ICON>fileaway.ico</NFX_ICON>
<NFX_OBJECT_NAME>coolmaps.com FileAway</NFX_OBJECT_NAME>
<NFX_OBJECT_INFO>coolmaps.com FileAway</NFX_OBJECT_INFO>
<NFX_TOOLTIP>FileAway</NFX_TOOLTIP>
<NFX_TOOLBAR_TITLE>coolmaps advanced</NFX_TOOLBAR_TITLE>
<NFX_TOOLBAR_BRANDING>coolmaps</NFX_TOOLBAR_BRANDING>
<NFX_TYPE>Layout</NFX_TYPE>
To take the FileAway component off of the CoolMaps Advanced tool bar and have it show on your custom tool bar just edit the text between these tags to the name of your custom toolbar
<NFX TOOLBAR_TITLE>My Killer TOOLS</NFX TOOLBAR_TITLE>
Do the same to all components that you wish to show on your custom toolbar. You can associate the component icon from this file as well as a number of other things so be careful (that is why you made the full backup of your components folder... you did make a backup didn't you... if not do it now before you edit anything).
Did you find this tutorial useful? Would like to view all of our tutorials and support pages?
Join the NetObjects Fusion Users Group Community
This page was written by and is maintained by turtle
|