|
This is a QuickTip on how to flow text around a curved object in a pic, like the example in my demo.
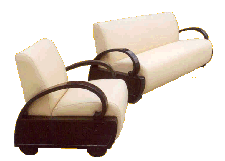
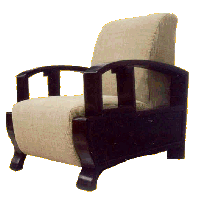
  You can't strictly do this in HTML, since the picture is the full rectangle, which can include lots of blank space, like the pictures at left and right. You can't strictly do this in HTML, since the picture is the full rectangle, which can include lots of blank space, like the pictures at left and right.
These two pics (of the two lounges at left and the one at right) have been placed and are "alinged left wrap" and "aligned right wrap" respectively. But you will note that the text doesn't follow the curve of the chairs - it follows the edge of the pic which includes lots of blank space.
If you want to go to just a little bit of effort, you can follow the curve of the images (with a workaround) as I have done on my demo page. The text doesn't actually "wrap" around the curves, but it looks like it has.
Here's how:
Firstly
You must be using CSS to specify your fonts. Indeed, my instructions here assume that you are using the recommended method for ensuring that your layout is stable (See this page.). This means using Dynamic layout (table based) but using CSS for specifying fonts. This is the most reliable method of publishing your sites. Using this method, you can fix your layout pretty much the way you want, but cross-browser and internal-Windows CSS irregularities won't mess it up!
But, the Dynamic/CSSFonts method doesn't allow overlapping. It's a limitation. You can generally work around it, however, sometimes, for a small section of your site, you might really want to overlap things. That's what I've done here. I've made a small area of a page that is set for Fixed publishing. Just this small section - this Layout Area - uses CSS for everything (not just text), and lets me overlap in this area only.
So, for the layout region you make here (see below), set it lke this:
[The following refers to my demo, where I had two pics (the ones above) that I wanted to flow around - one on the left of the Layout region, the other on the right. Experiment for yourself if you've only got one pic, or more.]
___________________________________________________________________________
Steps
Make a new Layout region on your page, using Fixed Layout publishing for this region alone, as described above.
Drop both pics onto this Layout Region, placing them where you want them in relation to the rest of your page.
Put a text box on the Layout Region, totally overlapping both pics. (I found I got the best results here when I placed the text box and the left hand pic hard against the left side of the layout region. This made the spacing of the text - see below - very precise.)
Enter your text into the text box.
Use the Space bar to move the start of the first line where you want it with relation to the left image.
Put a line break (Shift-Enter) where the first line gets to the point where it starts to overlap the right image.
Now, put the cursor at the start of the next line. Use the Space bar to move the start of this line to your desired place with regard to the left image.
Put a line break (Shift-Enter) where the text on this second line now begins to overlap the right image.
Continue doing this for each line of text, fitting it as you want.
Get the idea?
Good luck!
_______________________________________
This page was written, and is maintained, by Dallas
|