This section of the tutorial will go over the basic operation and location of tools and functions that you will need to know in order to work with the AWM software. It is not an extensive or all inclusive tutorial. It covers just the basic operation of the software and the sequence that tasks must be performed in order for AWM to work with the NetObjects Fusion product.
When AWM starts you will see a default stock menu outline. You can modify this default menu or start a new blank menu. To show the functions of AWM in this tutorial we will start a new blank menu by clicking the New Icon (the first one on the left). If you have previously created a menu you can open it by selecting the File menu option and you will see previous menu project files in the drop down.
Below the menu bar and icon bar is your work area which has 2 windows. On the left is the Menu Structure window and on the right is the Properties window. The Properties window will change and display different functions and options depending on what you have selected in the Menu Structure window. Different Tool Icons will enable and disable depending on what you select in the Menu Structure window.
Setting Menu Positioning

Just above the work area you will find 
Click on that button to bring up the Menu Positioning window.
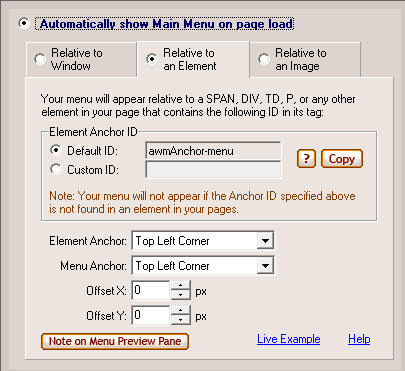
On the menu positioning window, select Relative to an Element (the center tab). You can keep the default element anchor name or you can change it to something else if you would like. There is no reason to change the default anchor name.
Do not change the Automatically Show Menu On Page Load default setting as you wish your menu to display every time a page is drawn.
Do not change any of the anchor positioning nor any of the off set numbers, leave these as they are defaulted. To close the Menu Positioning window click anywhere on the AWM program.
Setting Vertical or Horizontal Menu Display

Click the Style Editor tab. Then double click within the input box on the Type row. Select the display orientation of your menu in the properties palette that will apear. Set you spacing and other menu display options on this palette
Setting Site Root and AWM Folders
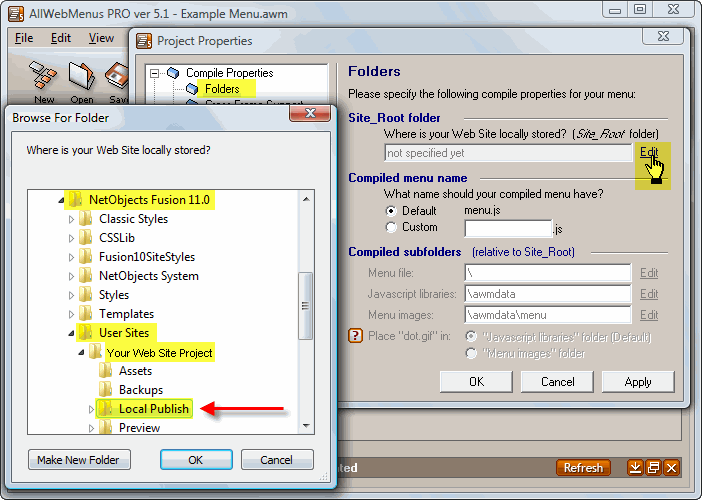
AllWebMenus needs to know where your web site is stored on your computer. It uses root relative notation in the menu structure for web site navigation so it needs to know where your site root is located so that it can write the proper link reference for each menu item. By default NetObjects Fusion stores your published web site in a folder called Local Publish. The Local Publish folder is your Site Root. If you do not know where your Local Publish folder is located, go over the gotFusion where Fusion stores your local web site tutorial.

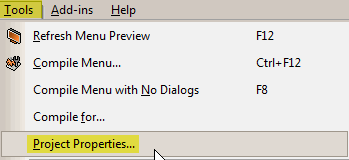
To set Site Root and change the default storage folders in AWM, from the Menu Bar select the Tools menu then from the drop down select Project Properties.
Select Folders from the Compile Properties list.
In the Site_Root area, click the Edit link and navigate to your Local Publish folder, select it, then press OK to set Local Publish as site root in AWM.
You can change the default name for the menu.js file by selecting Custom under the Compiled Menu Name. There is no need to change this unless the name conflicts with another file and as long as AWM is the only menu you are using there will be no naming conflicts.
By default AWM will place the menu.js file in site root. It will place the js library files in a folder called awmdata. Any images used by the menu will be placed in a folder called awmdata/menu. You can change these default locations by clicking the Edit link at the end of each storage location option. There is no reason to change this default location but you can if you wish. If you do change the storage location for any of the files used by AWM, any new folder MUST be located within your Local Publish folder.

Save your AllWebMenus Site Project

Once you have all settings filled in, it is time to save the AWM menu project on your computer
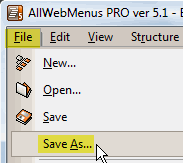
From the Menu bar select File then from the drop down select Save As
Navigate to your NetObjects Fusion User Sites folder and save your AWM site project in the Site Name of the NetObjects Fusion project that it is being used with. Saving the AWM project file in the same folder as the NetO NOD file will make locating it easier in the future. If you decide to keep your AWM menu project file in another location make a note of where it is stored. If you cannot find your AWM menu project again you will have to start all over and rebuilt your menu structure from scratch.
