Creating A Menu Structure With AllWebMenus
You should still have AWM open and a new named menu project running.
Launch NetObjects Fusion, open your web site project and go to Site View
Bring AWM on top of your Site View to help you create your menu easier
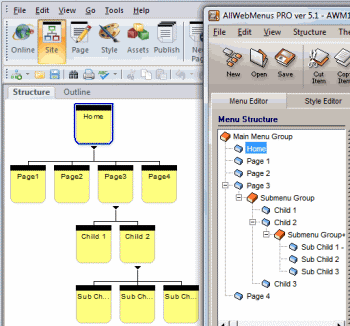
You will be matching your Fusion site project structure to your AWM site project structure
You will have all of your page names right in front of you which will help you decide what you want to name your menu structure items
Naming Your Menu Buttons in AllWebMenus
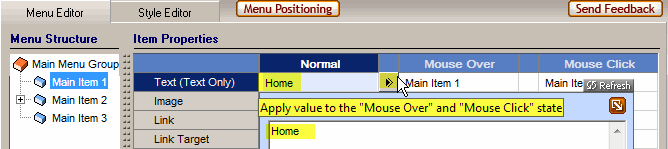
The first Menu item should be your Home Page (index.html). In the Menu Structure window, select the Main Item 1 (the first menu button). Click in the box under the Normal Column in the Text Row and in the dialog box that opens give your first menu selection the name that you want to display on the button. Then click the triangle next to the name to copy this name to all 3 states of the menu button.

Go down the list of Menu Items in the Main Menu Group until you have all of your primary level 1 menus named. If you need to add another Menu Item, highlight the menu item directly above where you wish to have your new menu button display and from the Tool Bar select the Add Item tool and a new menu item will be added directly below the one you highlighted.

To add a flyout menu to one of your buttons, highlight it, then from the Tool Bar select the Add Group tool icon. A new Submenu Group with a single Menu Item will be added to the menu you highlighted which you can name in the same manner as described above. To add more flyout options to the selected level 1 primary button, highlight the new item and press the New Item icon again. You can then add additional flyouts to the sub menu level by highlighting any of the new menu item you created and clicking the add Group icon again which will create another flyout off of that submenu item.
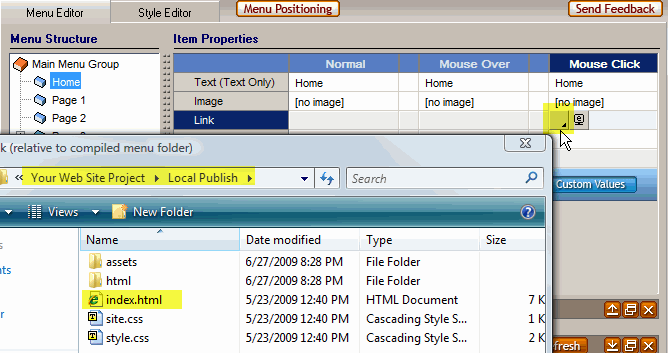
Linking to your NetObjects Fusion Pages
To link a menu button to a NetObjects Fusion page, click on the Link Row. Then under the Mouse Click Column, click in the gray box that has a triangle in the lower right corner. This will bring up the link navigation where you can select the page you wish to link to the menu button you have highlighted in the Menu Structure column
Continue linking all of the menu buttons as outlined above
When you have all of the pages in your web site as menu buttons and all of them are linked, save you AWM menu project by pressing the Save Icon or from the menu bar you can select File then Save
Compiling your AllWebMenus Project

Once you are finished adding and linking your menu and you have it safely saved you will need to have AWM compile all of the files it needs to run the menu on your web pages. From the Tool Bar select the Compile Menu icon
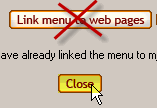
When AllWebMenus finishes compiling and creating the files and folders in your Local Publish folder you need to select the Close button on the success message window. DO NOT click on the Link Menu to Web Pages button. All linking of your compiled menu will be done automatically by the AWM Fusion Component in the next step.
Continue to Part 4 of the AllWebMenus tutorial -->
|
Did you find this tutorial useful?
Do you want to keep this resource online?
Make a donation to keep gotFusion alive
This page was written by and is maintained by turtle
|
|