Using The Fusion Nav Bar Component
NetObjects Fusion has always had a built in navigation component which writes complex html and javascript. The component is placed on a new web site when the site is created. should you accidentally delete the component, it can be placed on the page again by selecting the Nav Bar icon from the tool bar  and drawing a rectangle on the page where you wish the site navigation to be located. and drawing a rectangle on the page where you wish the site navigation to be located.
Note: If you draw a horizontal rectangle you will get a horizontal set of navigation buttons. If you draw a vertical rectangle you will get a vertical set of navigation buttons.
 The Nav Bar tool has a drop down feature which allows you to select a graphic button based Nav Bar or a text based Nav Bar. The last selection on the Nav Bar drop down is the Banner selection. The last selection is remembered and is used as the default until you leave the page. When you go to a new page or return to the page you last used the component on, the Button Nav Bar becomes the default selection for the tool once again. The Nav Bar tool has a drop down feature which allows you to select a graphic button based Nav Bar or a text based Nav Bar. The last selection on the Nav Bar drop down is the Banner selection. The last selection is remembered and is used as the default until you leave the page. When you go to a new page or return to the page you last used the component on, the Button Nav Bar becomes the default selection for the tool once again.
Site Structure or Custom
The Nav Bar component has 2 modes of operation. Site Structure or Custom. Use the radio button at the beginning of the Nav Bar properties palette to select between these 2 modes of operation
Site Structure Nav Bar
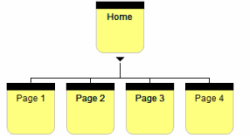
The default setting for the Nav Bar component is to create site navigation based upon your site structure as created in Site View. The component will create buttons for each of your pages based on how you have added pages in Site View. When you move a page in Site View, the Nav Bar button will also move to reflect the page's new location in the site structure. In Site Structure mode the Nav Bar component is completely automatic. If you add a page, it gets added to the Nav Bar. If you move a page, the page will be also moved in the Nav Bar. If you remove a page it will be removed from the Nav Bar. This is the simplest way to maintain your menu structure as it does not require any input from the user. It just works.


Custom Nav Bar
By checking the Custom radio button you enable the Custom Nav Bar features. All pages are removed from the Nav Bar component and you must click the Edit button and add each page manually.

After you click the Edit button your are presented with the Custom Navigation Bar Structure palette.
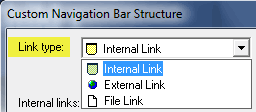
 You have all of the options on this palette that you do on the standard Links properties palette. Internal links which are your Fusion pages. External links which are other web sites. File links which can be any file such as a PDF, Word, Zip. etc. The approperiate input box will open based on your selection You have all of the options on this palette that you do on the standard Links properties palette. Internal links which are your Fusion pages. External links which are other web sites. File links which can be any file such as a PDF, Word, Zip. etc. The approperiate input box will open based on your selection
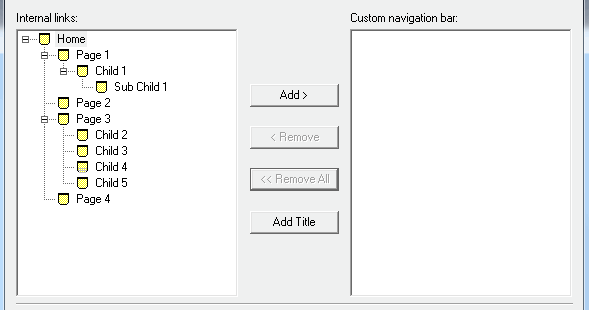
In the center of the Custom Navigation Bar Structure palette is the Nav Bar creation window. The left side shows you all of your Fusion pages. The right side shows you the Nav Bar as you build it.

Moving Pages Into The Nav Bar Site Structure
There are 3 ways to move pages from the left side to the right side
The Select and Add method: You first select a page you want to move into the Nav Bar structure on the left side by clicking on it. Then you pressing the Add button in the center to add the selected page to the Nav Bar. To add another page, click on it in the left column then click the Add button. The page will be added below the previous page.
The Double Click method: You can double click on a page on the left side and it will be added to the right side Nav Bar structure.
The Drag and Drop method: You can drag pages from the left side to the right side. Pages added will be placed directly below the previously moved page.
The placement of pages in the Nav Bar structure during movement is controled by selecting the page on the right side you wish to add the page under, then selecting the page on the left and using one of the move methods. You will see a faint highlighting of the selected page on the right to let you know which page is selected as the parent of the one you are going to add.
Once you have your pages on the right side, you can rearrange the display order by dragging and dropping any page into any order. This is how you arrange your Nav Bar appearance and display order, just by moving pages around.
To remove any pages from your Nav Bar, select it on the right side and press the Remove button. If you want to remove all pages and start all over, press the Remove All button and you will be back to a blank Nav Bar structure so you can start all over. See this tutorial for more details on arranging Nav Bar order.
Adding Null Links
You may find that you want one of the menu buttons to not be a link, just a place holder. This situation may arise when you have a lot of flyout menu options and you do not want the top button to link to a page but to only open the flyout menu. To add a non linked button, select the page on the right side that you wish to have the null button created under (this is typically the home page). Instead of selecting a page from the left side, click the Add Title button 
A new navigation button will be created and you can edit the name to anything you wish. Like the other pages in your site navigation you can drag and drop this non linked button to any location and you can move other pages under it so that the flyout menus open when the place holder button is clicked.
Link Targets
 When you select the Custom Nav Bar option, you have all of the standard link targeting options available for each button of the nav bar. You can select any existing target such as frame targets and new (_blank) windows. You can also add additional link targets by pressing the Add button and creating your own. When you select the Custom Nav Bar option, you have all of the standard link targeting options available for each button of the nav bar. You can select any existing target such as frame targets and new (_blank) windows. You can also add additional link targets by pressing the Add button and creating your own.

Javascript new windows
You can select the default javascript pop-up window which is 300x300 or you can custom defined javascript window of any size with any attribute.

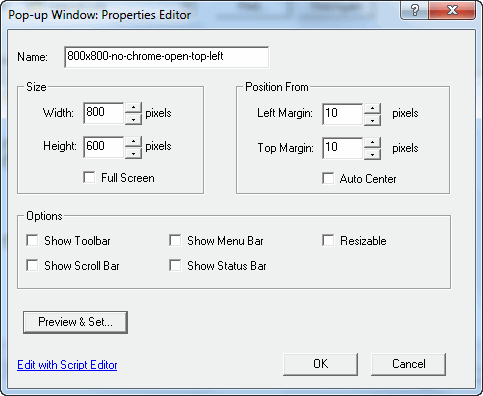
To create a custom defined javascript new window, press the Add button. This will bring up the Pop-up Window Properties Editor. Here you can set the size of the window, the position on the screen where it will open, and any of the predefined window attributes you wish to attach to the new window such as a scroll bar, tool bark etc. You can see what your new pop-up window will look like by pressing the Preview & Set button. When you are done, give this new window option a name that describes what the selection does such as 800x600-no-chrome for a plain no options window. When you finish click OK. Your new pop-up window definition will be added to the drop down so that you can select it and apply it to any button in the nav bar.

If you need to add more attributes you can click on the Edit with Script Editor link. This will open the script Editor properties palette where you can add or remove anything you wish from the javascipt new window code that Fusion will create for you. You should only use the script editor if you are familiar with javacript and know what you are doing.
|
Did you find this tutorial useful?
Do you want to keep this resource online?
Make a donation to keep gotFusion alive
This page was written by and is maintained by turtle
|
|