Ulead SmartSaver Pro
Ulead SmartSaver Pro is an image/graphics manipulation program that allows you to crop, resize, and compress images for use on your web site
Downloading and Installing
SmartSaver Pro is provided at no cost to everyone who hosts their web sites with us
If you do not have a hosting account with us upgrade your account to a web hosting account to receive this retail software along with other benefits all our hosting customers receive.
 To locate and download your complimentary copy you need to log into your gotFusion support account. Go to the gotFusion web site and click on the Click Here To Login button that is on the upper right of every page. To locate and download your complimentary copy you need to log into your gotFusion support account. Go to the gotFusion web site and click on the Click Here To Login button that is on the upper right of every page.
Once you are logged in, the button will change to say My Account, click it again to go to your account page.
Click on the Benefits link at the top of your accounts page or scroll down to the My Benefits section. There you will find a link to SmartSaver Pro 2.0. Click that link and you will be prompted to download the software. Install it on your home computer. If you do not find a copy of SmartSaver Pro on your account you are not a Pro level support member or you do not have your hosting account with gotFusion.
SmartSaver Pro is commercial software. It is not freeware. This copy is provided to you as part of your membership. A portion of the support membership fee or hosting charge was for this software. It is not to be given away. It is a licensed full retail commercial software product that is for your use only.
Using SmartSaver Pro
The three main sections of this program are: Cropping. Resizing. Compressing
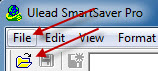 Start by opening an image in SmartSaver Pro. You can open an image by using the File > Open Image menu choice or clicking on the Open Icon in the tool bar. You can also open any image you have copied into your windows clip board from the File menu option File > Open From Clipboard. You will also see recently opened graphics in the File menu choice that you can re-open. Start by opening an image in SmartSaver Pro. You can open an image by using the File > Open Image menu choice or clicking on the Open Icon in the tool bar. You can also open any image you have copied into your windows clip board from the File menu option File > Open From Clipboard. You will also see recently opened graphics in the File menu choice that you can re-open.
Cropping an Image
 From the toolbar select the Crop tool. The crop pop-up window will open with your graphic image inside of it. You can drag the crop mask over your image and by using the 8 handles on the crop mask you can position it to cut out only the portion of the image you want to use. The Crop window tells you some very useful information about your image. Above the image you will see two radio buttons that display the size of the un-cropped image in pixels (width x height). One radio button shows the size of the Current Image which is the image you have been working with and the Original Image size is that of the original you opened before you made any sizing changes to it. If you have not resized or previously cropped the image, both original and current image sizes should be the same. Below these two size numbers you will see the size that the image will become after you apply the crop to it. You can use this information to get the exact size you need during the crop process so that you do not need to open the image and resize it. When you have the crop mask positioned over the area you want to crop from the image, press the OK button at the bottom of the window. From the toolbar select the Crop tool. The crop pop-up window will open with your graphic image inside of it. You can drag the crop mask over your image and by using the 8 handles on the crop mask you can position it to cut out only the portion of the image you want to use. The Crop window tells you some very useful information about your image. Above the image you will see two radio buttons that display the size of the un-cropped image in pixels (width x height). One radio button shows the size of the Current Image which is the image you have been working with and the Original Image size is that of the original you opened before you made any sizing changes to it. If you have not resized or previously cropped the image, both original and current image sizes should be the same. Below these two size numbers you will see the size that the image will become after you apply the crop to it. You can use this information to get the exact size you need during the crop process so that you do not need to open the image and resize it. When you have the crop mask positioned over the area you want to crop from the image, press the OK button at the bottom of the window.

Resizing an Image
You want images that are sized to fit your web pages. There is no cut and dried "rule" to follow as far as image size goes on the web. You do need to remember that the larger the image, the slower your pages will load. If you want or need large images you should consider placing a smaller image or thumbnail on the main page and linking from the smaller image to a pop-up or new page that contains the larger image. That way you can have fast loading pages and still offer your visitor the option to look at a larger image.
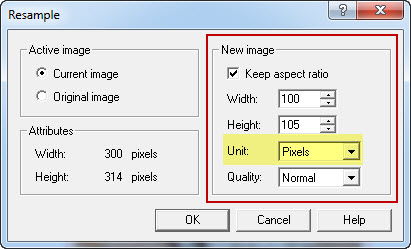
 From the tool bar select the Resample tool (the resample tool is just to the left of the Crop tool). The Resample pop-up window will open. On the left side of this window you will see the size of the original image or the current image (use the radio button to select either). On the right side is where you resize the image. From the Unit: drop-down box select Pixels. Using pixels in stead of a percentage you can get the exact size image you need by entering either the image Width or Height that you require. Always keep the box marked Keep aspect ratio checked otherwise your image will shrink or stretch and distort. Keep aspect ratio means to move both height and width in proportion to each other when changing one of the sizes. When you have the image height or width selected that you need, press the OK button to close the pop-up window and resize the image. From the tool bar select the Resample tool (the resample tool is just to the left of the Crop tool). The Resample pop-up window will open. On the left side of this window you will see the size of the original image or the current image (use the radio button to select either). On the right side is where you resize the image. From the Unit: drop-down box select Pixels. Using pixels in stead of a percentage you can get the exact size image you need by entering either the image Width or Height that you require. Always keep the box marked Keep aspect ratio checked otherwise your image will shrink or stretch and distort. Keep aspect ratio means to move both height and width in proportion to each other when changing one of the sizes. When you have the image height or width selected that you need, press the OK button to close the pop-up window and resize the image.
Compressing an Image
Once you have your graphic cropped as you want it and resized to fit where you need to use it, you now must compress the image and save it. This is a single process (save the image at a compression level). File size is different from image size. Image size is the physical size of an image (xxx pixels wide by xxx pixels high). File size is how much room the file takes up on the hard drive (which determines how fast or slow the image loads on the web page). The compression applied to an image determines the actual weight of the image (the size of the file in kb). You can have 2 images of the exact same physical size (600x460 pixels) yet one file can be 500 kb and the other file 60 kb depending on the amount and type of compression applied when the image was saved. Image compression is a subject all to itself and there are books devoted to this subject.
The basic rule is: You want to compress images used on the web as much as posable without introducing artifacts (blurriness, loss of detail, etc)
Click the Optimizer button To bring up the split screen mode

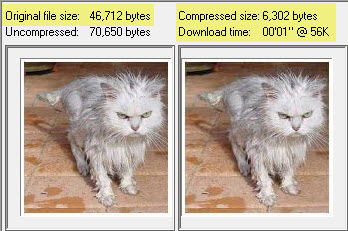 In the dual image mode you have the original on the left side and the manipulated image on the right side. You will see the size of the image in bytes (both for the original image and for the compression you have selected. You will also see the estimated download/display time based on a 56k baud modem connection. You should try to keep your load time to under 5 seconds per image and the image size to under 25k. The example image in the split screen to the right is compressed to 6k and will load in 1 second. In the dual image mode you have the original on the left side and the manipulated image on the right side. You will see the size of the image in bytes (both for the original image and for the compression you have selected. You will also see the estimated download/display time based on a 56k baud modem connection. You should try to keep your load time to under 5 seconds per image and the image size to under 25k. The example image in the split screen to the right is compressed to 6k and will load in 1 second.
Below the split screen is the tools to control the image type and compression applied.
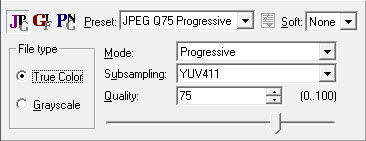
You have a choice of JPG, GIF, or PNG as the saved image type. Clicking on the graphic will select that type of image to be saved
Next to the Image type is a drop-down containing 4 preset compression levels, 2 for color, 2 for black and white. You will find that using the 75 or 50 will be the choice you use the most. Watch the file size and load time change as you move between these presets. You will also see the actual compressed image in the right split screen to see if the quality starts to degrade too much.
You can also select a custom compression by either changing the number in the Quality input box or moving the Slider below that input box. Watch the image in the right size split screen and keep an eye on the image size and load time. Remember the basic rule. You want the most compression you can get without causing the image to degrade.
Saving an Image
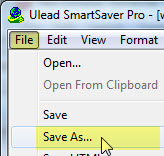 Smartsaver Pro applies image compression when you save an image so don't forget to save your images after working with them. From the menu bar, select File > Save As... Smartsaver Pro applies image compression when you save an image so don't forget to save your images after working with them. From the menu bar, select File > Save As...
Important: Always use Save As when you are saving a copy for the web to avoid overwriting your original image.
Hint: A good habit to get into is to save a copy of your image under a different name immediately upon opening the image to work with it. That way you will be working with a copy and avoid accidentally overwriting an original image. One you over write an original image with a cropped, re-sized, and compressed graphic the original is gone unless you have a backup stored in a safe location.
Use care when saving to make sure you are saving a copy not overwriting your original image.
Once you selected Save As and given the new image a name you are all done and can use the cropped, re-sized, and compressed image on your web page.
SmartSaver Pro has many more features but these are the 3 most important ones that you will use over and over again.
Creating Graphics for the Web
Now that you know how to use Smart Saver Pro, go over this gotFusion tutorial about web graphics and what is the appropriate size and weight to use
Or click the NEXT button below
External sites about Image Compression
Web reference image compression
Wikipedia reference image compression
|
Did you find this tutorial useful?
Do you want to keep this resource online?
Make a donation to keep gotFusion alive
This page was written by and is maintained by turtle
|
|


