|
One of the most frequently asked questions by those of you new to Fusion runs something like this:
- "How do I show more than one level of pages in my navigation bar?"
To build good site navigation, you have many options. Fusion 7 adds more new navigation options for you.
You should think about which methods work best for your site, and for your site visitors.
Definitions
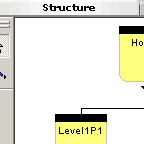
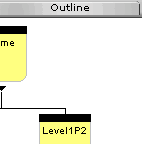
For the purposes of this tutorial, consider the level below your Home page to be Level 1. It is a "child level" of the Home page. Fusion calls this the "first level" of the site.
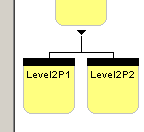
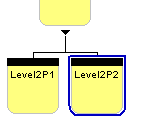
- Level 2 pages are children of Level 1
- Level 3 pages are children of Level 2.
- etc.
top of page
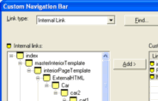
Custom Navigation Bars
The ability to make Custom Navigation Bars with any links at all on them was a new feature of Fusion 5. With Custom Navigation Bars, you can arrange your site navigation any way you desire.
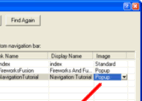
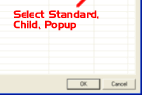
Fusion 7 has improved the Custom Nav Bar. You can now designate linked pages to be:
- Part of the main nav bar ("standard"),
- Part of the main nav bar, but using the secondary type button ("child"), or
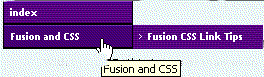
- A mouse-over "popup" (flyout) from the standard button above it in the list
Custom nav bars work fine, if your site is not too big. But if you have dozens of pages, and keep adding new pages to your site, a custom nav bar that links every page on your site quickly becomes:
- Hard to manage, and
- Too big and too confusing for users
top of page
Standard Nav Bars
- Use the power of MasterBorders to create standard nav bars that work within each section of your site.
For larger sites with lots of pages, you should create standard nav bar controls that let your visitors move around within each section of your site. To do this,
- Create a new MasterBorder to use at each level of your site, and
- Place multiple navigation bars in a table in the page margins.
Placing navigation bars in a table allows them to grow without overlapping as you add new pages to the site.
Level 2 Navigation
Go to any page on Level 2 of your site. To create multilevel navigation, follow the steps below:
- Create a new MasterBorder called Level2
- Delete the existing Navigation Bar, and place a 1-column, two row table in the page margin. Set the table properties to 0 border, 0 cell padding, and 0 cell spacing.
- In the margin below your table, draw a new Navigation Bar.
- Drag it into the top table cell.
- Set the properties of your first navigation bar like this: First Level, Include Home Page box checked, Include Child Pages blank.
- In the margin below your table, draw another new Navigation Bar.
- Drag it into the bottom table cell.
- Set the properties of your second navigation bar like this: Child Level, Include Home Page and Include Parent Page check boxes blank.
Set the MasterBorders
The last thing to do is set the correct MasterBorder on your pages. Site View is the best place to do this.
- Select the level2 pages by holding down the Shift key while clicking on them.
- In the Properties dialog, select your Level2 MasterBorder, and
- Click the Set On All button.
As you add new pages to your site, just make sure to set the correct MasterBorder for each page according to its position in your site structure. The navigation bars will update automatically through out the site.
What If You Need More Levels?
If your site structure is bigger or more complex than our example, the process you'll use will be similar. You may want to put as many as three navigation bars on pages in the "middle" of the site:
- One pointing to the First level and home pages,
- One to the current level (and Parent, if it's down three or more levels in the structure), and
- One to child pages.
Some larger sites that I have designed in Fusion use as many as 6 or 7 different MasterBorders, to accommodate structural differences between site sections.
top of page
Navigation Components
The Fusion "Go Menu"
|
.
|

|
|
|
|
Other good components for navigation:
top of page
Navigation Useability
To make any of these strategies work for your site users, it's important to do a few things before you hit that publish button. First, pretend you're a site user, and ask yourself some questions:
- Do the button names for my pages tell me what I'll see when I go there?
- Does the site structure make sense?
"Don't put the Milk at the back of the store."
Put things that your users want to find where they can find it: on the home page or one click away from the home page!
- Have you organized the site so that things that belong together are grouped together in the site?
Or are some things a little mixed up? Are the Cookies near the Milk, or are the Cookies off by themselves in the Produce aisle?
- Have you put too many links on the home page? Sometimes it's better to give site users a few good choices than too many unknowns to click on.
top of page
More Tips For Navigation Design
top of page
|