|
Learning Table Skills
 You must be in Page View to work with Tables. To get to Page View, click the Page icon. You must be in Page View to work with Tables. To get to Page View, click the Page icon.
Using "Undo" and "Redo"
- If you make a mistake, click Edit, Undo (CTRL+Z).
- If you change your mind, click Edit, Redo (CTRL+Y).
Finding the table tool
- If you can't see the Standard Tool Bar, click View, Tool Bars, Standard Tools.
- If you can't see the Table Tool, click and hold the Layout Region Tool to select the flyout Table Tool icon.
See Anton's tutorial about using toolbars.
Drawing a table
You can place a table in
- A MasterBorder,
- A Layout,
- A Text Box,
- A Layout Region, or
- Another table's cell.
To place a table on your page,
- Click the Table tool.
- Draw the outside edge of your table.
- Point where you want the top left corner of your table.
- Click and drag to the bottom right corner of your table.
- Release the mouse button.
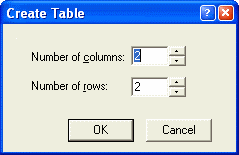
 Fusion displays the Create Table dialog. Fusion displays the Create Table dialog. - Enter a Number of columns, or click the up-down arrows to increase or decrease.
- Enter a Number of rows, or click the up-down arrows to increase or decrease.
- Click OK.
A table appears. Don't worry if
- Your table is the wrong size,
- Your table needs more rows or columns, or
- Your table is in the wrong place.
You can edit your table later.
Working with table properties
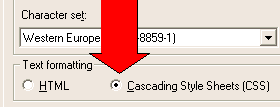
 Note: Some table formatting options require Cascading Style Sheet (CSS) support. To enable CSS, Note: Some table formatting options require Cascading Style Sheet (CSS) support. To enable CSS,
- Click Tools, Options, Current Site.
- Select Cascading Style Sheets (CSS).
For more information about CSS, see this tutorial.
 Setting relative or fixed-width Setting relative or fixed-width
You can set relative or fixed width only if a table is in
- A text box, or
- Another table's cell.
The width option in the Table Properties dialog is greyed-out for tables on a MasterBorder, Layout or Layout Region. All tables in such locations are Fixed Width.
To learn the difference between Relative and Fixed width, see the Glossary.
|