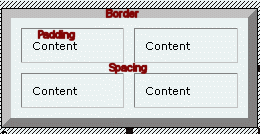
Understanding border, spacing and padding
 All sizes are in pixels.
- Border: How wide is the table border?
- Padding: How much space between cell content and cell edge?
- Spacing: How far apart are the cells?
Setting border, spacing and padding
To set sizes,
- Enter numbers in Table Properties, or
- Click up/down arrows to increase/decrease.
Setting background
To set a background, click the Background tab on any Properties dialog.
Note: Gamma rendering differences cause Macintosh systems to display graphic colours differently than Windows PCs.
- Use all graphic backgrounds, or all Hex colour backgrounds.
Setting row, column or cell properties
To set properties,
- Select the object,
- Set options on the Properties dialog.
To select a row,
- Click the table
- Move the pointer to the left edge of the row
- Click when the pointer changes to a bold horizontal arrow.
To select a column,
- Click the table
- Move the pointer to the top edge of the column
- Click when the pointer changes to a bold vertical arrow.
To select a single cell, click the cell. To select a different cell, press an Arrow key. To select multiple adjacent cells, press Shift+Arrow.
Tip: If you find it difficult to select page or table objects, use the Object Tree (F4).
Working with the Object Tree
The Object Tree shows every object on the page.
- To toggle the Object Tree on or off, press F4.
- To reveal hidden objects, click +.
- To select an object, click its Object Tree icon.
Tip: to make the Object Tree easier to understand, assign friendly names to objects.
To name an object
- Select the object
- Click the Actions tab on Properties,
- Enter a name in the Object ID box.
Note: Your object names must use
- Only alphanumeric characters (A-Z, a-z, 0-9),
- No spaces.
Setting column width
To resize a column
- Click and drag a top ruler bar column handle, or
|

|
- Click and drag a column border.
|

|
Setting precise width
- Select a column.
- Enter a number (pixels), or click up/down arrows to increase/decrease.
To set a column to the exact width of graphic content, click Fit to Contents.
Note:
- You can't make a column narrower than its widest object.
- If you need a narrower column, remove or resize the object.
Setting row height
To resize a row
- Click and drag a left ruler bar row handle, or
|

|
- Click and drag a row border.
|

|
Setting precise height
 Check Row Height Specified.
- Enter a number.
To fit a row to its tallest content, uncheck Row Height Specified.
Notes:
- You can only specify row height equal to or greater than the tallest content.
- If you need a shorter row height, remove or resize some objects in the tallest cell.
Merging Cells
To merge cells,
- Select two or more cells,
- Right click
- Choose Merge Cells.
Splitting Cells
To split cells,
- Select one or more cells,
- Right-click,
- Choose Split Cells,
- Enter number of columns,
- Enter number of rows,
- Click OK.
Note: Fusion limits cell splitting. You can not split a cell into more than
Nesting Tables
Caution:
- Be careful with nested tables.
- Don't let them get too complex.
How complex is "too complex?" I don't know exactly.
- But you will know when the problem bites you.
- Now you can't say I didn't warn you :-).
Old versions of Netscape frequently crash when rendering pages with deeply nested tables. When that happens to a site visitor, how likely is a return visit to your web site? (Hint: consider the probability of a hot January night in Tuktoyaktuk, Canada.)
Fusion can crash when you click icons in the Object Tree to navigate very complex nested table structures. This happens to me with enough regularity to offer a good explanation for my hairline.
Making tables within tables
Why would you want to do this? Is it faster or easier than splitting a cell? Sometimes, yes.
- Create a new page.
- Click the Table Tool.
- Draw a 3x3 table in the Layout.
- Double-click any cell to select it.
- Click the Table Tool.
- Draw a 3x3 table in the cell.
Here's a quick way to embed an existing table inside another table cell.
- Click a table's Object Tree icon.
- Press CTRL+C.
- Double-click in the target table cell.
- Press CTRL+V.
You might want to do this when you want to embed a fancy table design inside another table.
- Access to the next sections of this tutorial are restricted to gotFusion Lite or Professional Members. To become a member, go to this page.