|
This exercise uses graphics to "fool the eye" into thinking that a table does not have square corners. Use tables designed like this for a whole page, or just to accent an area of a page.
This exercise requires
- The graphics in this Zip File titled TableProjectFiles.zip (click link to download file)
- Your copy of NetObjects Fusion up and running your Learning Tables.NOD file from the previous exercise.
Producing the rounded table
Create a new page in Site View. Name your new page Rounded Table.
|

|
|
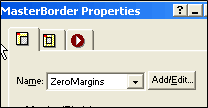
Figure 10 — Set ZeroMargins MasterBorder
|
|

|
|
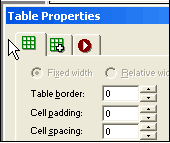
Figure 11 — Border, padding, and spacing set = 0.
|
|
Setting up the rounded table page
- Switch to Page View.
- Press F10 to open MasterBorder Properties.
- Select ZeroMargins (Figure 10).
- Press F9 to open Layout Properties.
- Click the Text Tool.
- Click and drag to draw a box about 500 px by 300 px on the layout.
- Release the mouse button.
- Click the Table Tool.
- Draw a table inside the text box a bit narrower than the text box.
- Set 3 columns, 3 rows.
- Click OK.
- Set Border, Padding and Spacing to 0 (Figure 11).
If your table "disappears," click its icon in the Object Tree (F4).
Now we are ready to add the "fool the eye" graphics that will make this table look like it has rounded corners.
Adding the graphics
Note: All graphics in this section are in C:\TableProject\Graphics\RedRoundedRectangle.
- Click the Picture tool.
- Click the first row, first cell.
- Locate RTopLeft.gif, using the Picture File Open dialog and the path above.
- Repeat steps 1-3 with the following differences:
- Place RTopRight.gif in row 1, column 3.
- Place RBottomLeft.gif in row 3, column 1, and
- Place RBottomRight.gif in row 3, column 1.
- Click the cell at row 2, column 1.
- On Cell Properties, Cell Tab, Background Image, click Browse to select RLeftBG.gif.
- Click OK.
- Repeat steps 5-7 with the following differences:
- Set row 1, cell 1 background to RTopBG.gif.
- Set row 1, cell 2 background to RTopBG.gif.
- Set row 2, cell 3 background to RRightBG.gif.
- Set row 3, cell 1 background to RBottomBG.gif.
- Set row 3, cell 2 background to RBottomBG.gif.
That wasn't so bad, was it? Don't worry if the table looks a little strange - we'll tighten it up.
- Select column 1.
- Click Fit to Content on Cell Properties, Column Width.
- Select column 2.
- Set 200 in Cell Properties, Column Width.
- Select column 3.
- Click Fit to Content.
Our table is all set. Let's add some text in the cell at row 2, column 2.
- Double-click the cell.
- Type whatever content you want.
Notice that as you add more content, the table stretches vertically. Now try this:
- Delete the text from the center cell.
- Use the Picture Tool to put the chart graphic from the last exercise into the center cell.
Notice how the red rectangle becomes a frame around the chart?
Design Variations to Try
Do you want two columns of text? How about a more complex layout with text and graphics?
Adding more cells to the table
- Delete the graphic.
- Split the center cell.
- Merge some of those new cells.
- Press CTRL+Z (undo) if you wreck something.
Experiment!
- Use your imagination!
- Have fun!
|